Todo module and data flow
The Todo module and its React component are a bit more interesting than Dashboard as they provide some interaction. The module contains a TodoList
component, displaying a list of Todo items retrieved from the server. User can then click the checkbox next to the item to indicate if that item
is completed or not. Internally the state of Todo items is maintained by the Todo module and TodoList just passively displays them.
Before going into the details of the actual Todo module and related components, let's ponder a while about data flow in a Scala.js React application.
Unidirectional data flow
Several JS frameworks out there (for example AngularJS) use mutable state and two-way data binding. In this tutorial, however, we are using Diode, which is a library for unidirectional data flow and immutable state. This kind of architecture works especially well in more complex applications, where two-way data binding can quickly lead to all kinds of hard issues. It's also a relatively simple concept, so it works well even in a simple tutorial application like this. Below you can see a diagram of the Diode architecture.

It consists of a Circuit that takes in Actions, and dispatches them to action handlers, and then informs Views to update themselves with the new data. See the Diode documentation for more information.
Modifying a Todo state
The TodoList component renders a checkbox for each Todo, which can be used to mark the Todo as completed.
<.input.checkbox(^.checked := item.completed,
  ^.onChange --> P.stateChange(item.copy(completed = !item.completed))),
Clicking the checkbox calls the stateChange method, which dispatches an UpdateTodo(item) action to action handler in SPACircuit. In the circuit the action
is picked up by TodoHandler's handle function, which updates the internal model with the new item and sends it to the server.
class TodoHandler[M](modelRW: ModelRW[M, Pot[Todos]]) extends ActionHandler(modelRW) {
  override def handle = {
    case UpdateTodo(item) =>
      val updateServer = () => AjaxClient[Api].updateTodo(item).call().map(UpdateAllTodos)
      // make a local update and inform server
      update(value.map(_.updated(item)), updateServer)
Once the server responds, the model is again updated with the data coming from the server. The update happens indirectly by dispatching an UpdateAllTodos
action, which is handled within the same TodoHandler.
    case UpdateAllTodos(todos) =>
      // got new todos, update model
      update(Ready(Todos(todos)))
The model update triggers calls to change listeners. As it happens, there are actually two separate components observing changes in the Todos. The components
themselves are not actually listening to these changes, but they are wrapped in a component that does. This wrapper reacts to changes and updates the component
within. This forces an update on the component, which in turn causes a call to render to refresh the view. The change cascades down to TodoList and to the
individual Todo that was originally clicked.
But as we mentioned before, there was another component interested in changes to the Todos. This is the main menu item for Todo, which shows the number of open Todos.
val todoCount = props.proxy().getOrElse(0)
Seq(
  <.span("Todo "),
  todoCount > 0 ?= <.span(bss.labelOpt(CommonStyle.danger), bss.labelAsBadge, todoCount)
)
This is the beauty of unidirectional data flow, where the components do not need to know where the change came from, or who might be interested in the change. All state changes are propagated to interested parties automatically.
Next, let's look how to set up everything for data to flow.
Wiring
RootModel
- Represents application model, including todos and motd
SPACircuit
- Singleton instance of Diode
Circuit[RootModel], holding application model and action handlers. - Also extends
ReactConnector[RootModel], providing integration to React components
TodoHandler
- Handles actions related to the todos.
MotdHandler
- Handles actions related to Motd.
To give our React components access to the application model, we have to connect them using SPACircuit.connect or SPACircuit.wrap methods.
SPACircuit.wrap(_.motd)(proxy => Dashboard(ctl, proxy))
SPACircuit.connect(_.todos)(Todo(_))
The difference between wrap and connect is that the former provides only passive read access to the model and the dispatcher, while the latter registers a
listener with the circuit and actively updates the wrapped component when the state changes. Both methods take a reader function that extracts the part of the
model we are interested in. The second parameter is a function that builds the component with a ModelProxy[A]. The ModelProxy wraps the extracted
model and provides access to the dispatcher.
Within Dashboard we further connect the Motd component to the model using the connect method of the ModelProxy.
proxy.connect(m => m)(Motd(_))
Because Dashboard received only the motd part of the model, we pass it as such to the Motd component.
Working with potential data
You may have noticed that instead of String the Motd component receives a Pot[String]. Pot is a helpful construct to handle data that can have multiple
states. It's quite much like Scala Option but more than two states.

Viewing potential data can be cumbersome, so Diode includes a handy implicit class to extend a Pot into a PotReact. This allows you to call specific render
methods that only render when the Pot is in a specific state, making it easy to show a "Loading" or "Error" message to the user.
proxy().renderPending(_ > 500, _ => <.p("Loading...")),
proxy().renderFailed(ex => <.p("Failed to load")),
proxy().render(m => <.p(m)),
renderPending has two variants and we are using the filtered one here. The first parameter is a filter for duration value. Only if the request has been in
pending state for more than 500ms will the "Loading..." message be displayed. The base render method renders the contents of the Pot if it has any.
You can also call the various isEmpty, isPending, isFailed etc. methods to query the state of the Pot, or use the monadic functions like map and
flatMap to operate on them.
Within action handlers you can manage the Pot state yourself, depending on the results you receive from async functions like autowire calls. For the common
case, however, you can utilize ready-made handlers that take care of all that, providing you with automatic retries and notifications while the request is
pending.
override def handle = {
  case action: UpdateMotd =>
    val updateF = action.effect(AjaxClient[Api].welcome("User X").call())(identity)
    action.handleWith(this, updateF)(PotAction.handler(3))
}
We first create an effect from the async call we want to perform and then pass that on to the PotAction.handler to be automatically managed.
For more information on Diode, please refer to its documentation.
Editing todos
For adding new Todo items, the user interface provides a button and a modal dialog box (using the Modal component described earlier). Editing
an existing item is performed by clicking an Edit button next to the todo description. Both actions open the same dialog. Finally you can also
delete a todo by clicking the Delete button.
TodoForm is a simple React component built around a Modal which allows users to edit an existing Todo item, or create a new one
(there is no difference between these two from the component's point of view). It looks like this
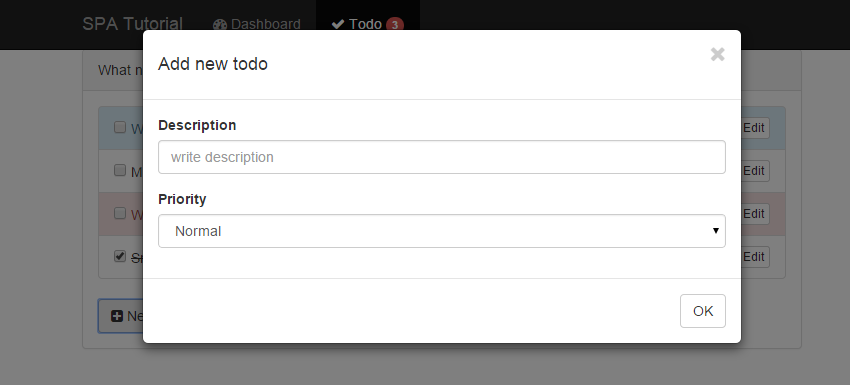
The dialog gets an optional item in properties and maintains current item in its state. The submitHandler callback is used to inform the parent
when the dialog box is closed (or cancelled).
case class Props(item: Option[TodoItem], submitHandler: (TodoItem, Boolean) => Unit)

case class State(item: TodoItem, cancelled: Boolean = true)
Building the component looks a bit complicated, so let's walk through it.
val component = ReactComponentB[Props]("TodoForm")
  .initialState_P(p => State(p.item.getOrElse(TodoItem("", 0, "", TodoNormal, false))))
  .renderBackend[Backend]
  .build

def render(p: Props, s: State) = {
  log.debug(s"User is ${if (s.item.id == "") "adding" else "editing"} a todo")
  val headerText = if (s.item.id == "") "Add new todo" else "Edit todo"
  Modal(Modal.Props(
    // header contains a cancel button (X)
    header = hide => <.span(<.button(^.tpe := "button", bss.close, ^.onClick --> hide, Icon.close), <.h4(headerText)),
    // footer has the OK button that submits the form before hiding it
    footer = hide => <.span(Button(Button.Props(submitForm() >> hide), "OK")),
    // this is called after the modal has been hidden (animation is completed)
    closed = formClosed(s, p)),
    <.div(bss.formGroup,
      <.label(^.`for` := "description", "Description"),
      <.input.text(bss.formControl, ^.id := "description", ^.value := s.item.content,
        ^.placeholder := "write description", ^.onChange ==> updateDescription)),
    <.div(bss.formGroup,
      <.label(^.`for` := "priority", "Priority"),
      // using defaultValue = "Normal" instead of option/selected due to React
      <.select(bss.formControl, ^.id := "priority", ^.value := s.item.priority.toString, ^.onChange ==> updatePriority,
        <.option(^.value := TodoHigh.toString, "High"),
        <.option(^.value := TodoNormal.toString, "Normal"),
        <.option(^.value := TodoLow.toString, "Low")
      )
    )
  )
}
State is first initialized with the provided item or with a new empty item. Within the render method (inside Backend) a new Modal is created and in the
properties we assign couple of button controls. Note how both header and footer are actually functions that are given to the Modal's Backend so that they
can call the hide function. In the OK button the form is first submitted before the dialog is hidden.
The form itself is quite straightforward, with handlers to update internal state as fields change. Note that with React the select element works a bit
differently from regular HTML5 and you must use value property to select the option instead of the typical selected attribute.
When the form closes, the parent's submitHandler gets called with the item and a flag indicating if the dialog box was cancelled.
def formClosed(state: State, props: Props): Callback = {
  // call parent handler with the new item and whether form was OK or cancelled
  props.submitHandler(state.item, state.cancelled)
}
But now it's time to get to the bottom of client-server communications!